Sweet Turnips that Just Don't Know When to Quit!


At the end of August, I pulled all my cucumber vines out of the garden, cleared the spot. The beans and corns are still going strong, weather was still decent. Staring at the bare spot, I thought to myself: if I leave it like it is, weeds are going to take over. I still have some Sweetbell Turnip left from the spring, what could I loose? I scattered the seeds in the newly cleared spot, without adding any fertilizers to the soil. Since I have never done this before, I sowed the turnips densely, thinking, the weather here in  the Pacific Northwest could turn any time, the extra seeds would give me some wiggle room in case not all of them will make it.  One week later, I spotted densely packed turnip seedlings everywhere. The turnips were not big enough to eat, and they grew way too close together. So I started thinning by eating the "micro greens" (they were delicious in salads). By October, I got golf ball sized turnips, I pickled, made roasted turnips, turnip au gratin, gave them away, looked for all sorts of ways to dispose of them.... This continued until Thanksgiving. After Thanksgiving, the weather was getting cooled and cooler. The night time temperature was going toward freezing.

I picked as big of a batch of turnips as I could. Washed and removed the greens, bagged the turnips. I was ready to give up the rest of it. December rolled along, we had several days with night time temperature down to the 20th. I did not go check the turnips for several days, I was certain they were goners. Well, well, well, what do I know?! I went to check my turnip patch today, they are still going strong!!!! Looks like the outer leaves may have been frozen and thawed, but the turnips were as sweet as ever! I am now convinced there must be anti-freeze in the turnips! That may well be the case, the starch in the turnips could be keeping them from freezing. Whatever the case, I am going to have to do this every year. The lesson is: Plant Silverbell Sweet Turnip in the fall, you will be richly rewarded!

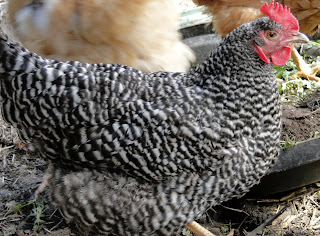
Barred Rocks: One of my favorite breed

Barred rocks are full of characters. They are inquisitive, friendly and easy to manage. They are somewhat early maturing, start laying after about 6 month. They are not very big in size making them ideal for backyard flock.

Leghorn-The egg laying machine

 At 4 lb. full grown Leghorns may not be as good looking as some of the other hens, but don't under estimate their egg laying abilities. Leghorns are bread for their egg laying abilities, most white eggs produced commercially are produced by leghorns. Our leghorns lay one egg a day for almost two years. They are not broody, and do not molt as frequent as the other hens. Since they are small in size, they do not consume a lot of feed, giving you excellent feed to egg conversion ratio.

Ameraucana Laying Hens

Ameraucana hens are fine laying hens, they are calm, non-aggressive and easy to manage. They love to graze, eating weeds and grass clippings or any vegetable scraps. They lay dark yellow yolked eggs. They lay eggs about every other day during their production period.


Sweet and Sour Eggplant

Learn to make the sweet and sour eggplant is well worth the efforts. The basic recipe for a sweet and sour sauce is: 3:2:1, that is 3 Tablespoons of sugar to 2 Tablespoons of vinegar to 1 Tablespoon of light soy sauce. Use a little cornstarch to thicken the sauce. You can add other stuff to suit your taste, I have added sesame seed oil, chopped scallion and crushed garlic to flavor the eggplant.

Ingredients:

1 large Eggplant
A pinch of hot pepper flakes
1 thin slice of ginger
Oil for frying

Light and Crunchy Batter:
3 T. rice flour (use all-purpose flour if unavailable)
2 T. cornstarch
1 egg yoke
3 T. rice wine vinegar or dry sherry wine

Easy Sweet and Sour Sauce:
3 T. sugar
2 T. Balsamic vinegar
1 T. light soy sauce
1 t. sesame seed oil
1 t. cornstarch
2 T. water
2 cloves of garlic, crushed
1 scallion, white part, chopped

Slice the eggplant into 1-1/2" x 1/4" slices. Sprinkle salt and toss. Let the eggplant set for 15 minutes. Squeeze to remove the moisture from the eggplant. Place the eggplant pieces in the batter. Toss to coat. Heat a large frying pan with 2" oil until hot. Fry the eggplant slices until golden, 2-3 minutes. Removed the fried eggplant and place them in a paper towel to drain.

Heat 1 T. oil in the frying pan, add hot pepper flakes and ginger. Cook until fragrance begin to come out. Add the sweet and sour sauce. Stir, cook until thickened. Add the fried eggplant, toss to coat. Slice the green portion of the scallion and sprinkle on top. Serve with rice.

A Good Problem to Have

When the Stallion White Cucumbers were done producing in late August, I removed the vines and cleaned the garden, turned over the soil left it for the winter. I happened to have some Silverbell Sweet Turnip seeds on hand, so I casually scattered the seeds in the spot where the cucumbers were growing. To my surprise, they all germinated and were thriving.  It turned out, the cool weather in September is exactly what the turnip needed to grow. Since I sowed the seeds quite intensively, early on I used a lot of turnip greens to thin them out. They were tender and mild, and I just used it as I would spinach. 30 days later, I started to get golf ball sized turnips, they were the BEST turnips ever, even better than ones I planted intentionally before. Now it is mid November, I am harvesting more turnips than I could ever use, and there is no signs of it slowing down! Turnips must have some sort of antifreeze in them, because the frosty mornings did nothing to damage them. This is one problem I do not mind having. Another benefit of this "ooops" was the turnip crowded out the weeds. This will reduced the weeds pressure in the garden next year. What more can I ask for?!

Baklava

Holidays are fast approaching, baklava, a decadent Greek dessert is easy to make is an instant hit in any party. You can make two different types of baklava with different nuts filling and shape them differently. It is made by layering nut filling and butter on sheets of phyllo dough, roll the phyllo dough up, bake the baklava in the oven and pour a hot syrup on top as soon as it is removed from the oven.

Ingredients:
1 pk. phyllo dough;
1 C. butter, room temperature;
Nut mixtures;
Syrup.

Making the Nut Fillings: Mix together: 1 lb. of finely chopped nuts (walnuts, almonds or pistachios or a mix of the three), 1/2 C. sugar, 1 t. cinnamon, 1/4 t. ground cloves. If making two types of baklava, make the fillings separately.

Making the Syrup: Add 1 C. honey, 1 C. water, 1/4 C. fresh lemon juice. 2 cinnamon sticks, 5 cloves in a sauce pan, bring it to a boil and continue boiling for 10 minutes to thicken the syrup. Set aside.

Method: Grease a 9x13 pan. Place 2-3 sheets of the phyllo dough and brush the top with butter, covering the entire sheet. Sprinkle a layer of the nut mixture. Alternating with phyllo dough and nut mixture until the pan is filled up. Put 3 extra sheets of phyllo dough on top and brush with butter. Lightly pat down the unbaked baklava, cut with a sharp knife into small squares, 1-2 inches in size. Bake in the oven for 25-30 minutes until golden brown. Check to make sure they do not burn. Pour the syrup on the hot baklava. Let cool. Place cut pieces of baklava into mini muffin liners for serving.


For the Baklava Rolls: Use different nut mixtures for different types of the baklava, here baklava are made into rolls with another nut mixture. To make rolled up Baklava pieces, spread out 2-3 sheets of phyllo dough, brush with butter, sprinkle with the nut mixture, place another sheet of phyllo dough on top, brush with butter. Using a piece of wooden dowel 1/2 inch in diameter, slowly roll up the prepared phyllo nut stack. Place the rolled up phyllo dough in a baking pan. Cut the roll into 3 in pieces. Repeat until all is done. Bake and top with syrup same way as above.

Kitchen How To's: Safe Hamburgers

A few years ago after hearing about  how hamburgers are massively produced in factories, and all the food born illness resulted from this practice, I decided to grind my own. I investigated different meat grinders, and settled on a 1800 Watt, 2.4HP meat grinder, and I am quite happy with it. Turns out, not only I can make great quality lean burgers (it's comforting to know my burgers come from one cow, not thousands), it also cost a lot less. Hamburgers at the super market can cost from $2.99 and all the way up to $5.99 per pound. To make my own burgers, I purchase beef from restaurant supply stores for around $2.00 per pound (round/chuck). It also gives me the flexibility of making some other cuts for stew or other recipes.

I usually cut up the beef, save some for stew or stir-fries, and then grind the rest up for burgers. For the hamburgers, I cut the beef into 2" chunks, run them through the meat grinder twice, this way I found, gives the beef better texture. After running through the grinder the second time, I shape the burgers into patties with two saucer plates, placing a sheet of butcher paper under each patty. Then I place them in ziplock bags and then paper boxes, and freeze them for later use.

The meat grinder is also great for making your own pork sausage, that will be the topic for the next post.... http://gardenmyway.com/healthy/bt-food/92-how-to-grind-your-own-meat


Red Chicken Curry

Red Chicken Curry
It is the end of September, I have harvested a dozen Green Chestnut winter squash from my garden. I invited my good friend Nellie to come and have a cooking party. Nellie is from Thailand, she said she has a good Thai dish which will really showcase the winter squash. She made this red curry with chicken, winter squash, eggplants and asparagus beans. As a principle, Nellie explained, you can put just about any meat or vegetable in a curry. Here's how she made the red chicken curry:

Ingredients:
1 can (28oz) coconut milk;
1 lb. chicken breast, cut into 1/2 inch pieces;
1 small winter squash, cutup into 1" irregular pieces (~4-5 cups);
2 Black Dragon eggplants, cut into 2" pieces;
5 red Thai peppers, seeded and sliced into 1/4 in. strips;
1/2 lb. asparagus beans, cut into 1" sections;
1 t. fish sauce;
5 cloves of garlic;
2-3 T. red curry paste (depending how hot you'd like it);
a few Thai basil leaves
2 kaffir leaves, thinly sliced

Method:
Remove the lid of the coconut milk, spoon the solid into a saute pan, cook until it begins to sizzle. Add 1 T. curry paste, mix until incorporated, add some coconut milk, and more curry paste. Continue until all 3 T. curry paste is incorporated with the coconut milk. Reserve 1/2 C. of coconut milk and add the rest in the saute pan. Add 2 C. water. Bring it to the boil. Add chicken pieces. Cook for 10 minutes until chickens are tender. Add squash, cook for 5 minutes, add eggplants, asparagus beans. Simmer, covered for 15 minutes. Add the Thai basil, stir in the last 1/2 C. coconut milk, add the kaffir leaves just before serving. Serve with Jasmine rice and a bottle of red wine...                    

After dinner note:
The winter squash is amazing in this dish. It is creamy, sweet and great to soak up the delicious curry sauce. The eggplants provided additional texture and body to the dish, and the asparagus beans provided a little crunchiness and a nice flavor. The chicken is tender and delicious. Nellie says the chicken can be substituent with beef, fish or shrimp. 

I can see how other vegetables can be easily incorporated into this dish, such as green peppers, tomatoes or even zucchinis. It is a very gardener friendly dish. This will sure become of dish that will frequent my dinner table. Good friends, good food... what more can I ask for?


Old Beans? Make Soup!

It is fall but you still got beans hanging on the vines, and inevitably, you'll have some that are too old for fresh eating. No worries, there are a number of ways to use the shelled beans. They happen to make the best soup. Try add them to your minestrone soups, or boil them and add chopped herbs, garlic and butter. If you still have more than you can use up, try dry them. They keep quite well after being dried. Shown in the picture below is the Purple Cardinal Pole Beans from New Dimension Seed. It produces long, slender purple beans throughout the summer and make great shelling beans in the fall...


Homemade Yum Pockets

"Hot pocket" seemed forever association with comedian Jim Gaffigan's joke-it embodies everything junkie and unhealthy life style. But, it doesn't have to be that way. You can make them at home and fill them with whatever fillings you like, from ham-n-cheese pockets to pizza pockets to chicken cordon blue pockets. And the best of all, they are very inexpensive to make. They can be individually wrapped and frozen. It will make a quick meal anytime.

1. Making the Dough:
3/4 C. lukewarm water;
2 C. all purpose flour;
1 t. sugar;
1/2 t. salt.
1 T. dry yeast powder
2 T. olive oil
In a large bowl, mix together yeast, water and sugar. Allow the yeast to bubble (5-10 minutes). Add the rest ingredients, knead to make a smooth ball. Cover and let stand in a warm place for approximately 40 minutes.

2. Making the Fillings:
Use whatever you have available on hand. The following combinations work well together:
(1) Ham + cheese + mustard:  Cut ham in thin strips, shred the cheddar cheese, add mustard
(2) Pizza filling: Anything that can go on a pizza: pepperoni, sausage, cooked onions, cooked green pepper etc. etc.. Add tomato sauce to bind all ingredients together and mozzarella cheese. This is the classical calzone.
(3) Chicken + Swiss Cheese + Ranch Dressing: This is a great combination. Add cooked onions, green peppers if you like.

3. Wrapping and Baking:
(1) Divide dough into 2" size dough balls, roll the dough balls out, fill with selected fillings and pinch the edges together. Arrange the pockets on a cookie sheet;
(2) Brush the top with some oil, then sprinkle salt, pepper and cheese on top if you like;
(3) Bake in a pre-heated 375 F oven for 20 minutes until the tops are lightly brown.


Garden Cook: Life Lessons I learned by Gardening

Garden Cook: Life Lessons I learned by Gardening
http://newdimensionseed.com/index.html

Easy Ceviche

Marinade:
Juice of 1 lemon and 1 lime each;
1/2 C. diced red onion;
2 diced jalapeno peppers;
1/3 C. chopped cilantro;
Seasoning: 1 t. sugar, 1 t salt and 1/2 t. pepper;
A dash of tabasco sauce;
Method: Mix above ingredients together, set aside.


Other Ingredients:
1 C. diced heirloom tomatoes;
1 small avocade, pealed and diced
1/2 lb cooked shrimps and/or crab meat.
 Method: Mix all ingredients together and pour into the marinade. Toss to coat. Chill at least 1/2 hour before serving.

Blueberry Pancakes from Scratch


    Ingredients:1 C. butter milk 2 whole eggs 2/3 C. flour 1 t. baking soda 1/2 t. salt 2 T. sugar 1 C. blueberries, fresh or frozen
    Method: (1) Beat eggs in butter milk (2) Mix together the dry ingredients (3) Add the dry ingredients to the butter milk mixture, then add the blueberries (4) Cook pancakes on a grease a cast iron pan until done (5) Dust with powdered sugar and serve

Heirloom Tomato Salad

Here's what's for lunch... Heirloom Tomato Salad made with day old Pumper Nickle Bread.
Assortment of tomatoes includes: Sungold, Sunsugar, Isis Candy, Green Zebra and Red Pear. Dressing: red wine vinegar, olive oil, minced garlic, finely chopped basil, salt and pepper. Topped with: feta cheese. SWEET!

Easy Salmon_Blackened Salmon

Salmon is one of the healthiest fish you can find. This easy salmon recipe is one of my favorites. It uses very few ingredients to achieve big flavor, and is delicious and heart healthy. Here’s how:

Ingredients:
2 pieces of fresh salmon
Fresh squeezed lemon Juice
Steak Seasoning
Butter and olive oil for frying

Method:
(1) Preheat oven to 400F. .
(2) Drizzle lemon juice on the cut side of the salmon, sprinkle with steak seasoning. Allow the fish to rest for a while.
(3) Cover the bottom of a pan with ½ olive oil and ½ butter; heat it to melt the butter. When the pan gets hot, place salmon pieces in it, skin side up. Cook until a nice crust has formed.
(4) Place the fish in the oven and cook for 10-15 minutes until desired doneness.
(5) Serve with micro-green salad, couscous and fingerling potatoes.


Spicy Green Olive


    Ingredients:
  • 4 C. of green olives
  • 1/2 C. good quality extra virgin olive oil
  • 3 cloves of garlic, crushed
  • 1 t. Italian seasoning
  • A pinch of hot pepper flakes (or more if you like)
  • Zest and juice from 1 large lemon
  • Method: Heat the olive oil in a pan until hot, remove from the heat. Add hot pepper flakes, garlic, Italian seasoning and lemon zest. Add the olives and then lemon juice. Marinate for at least 2 hours before serving. It is OK NOT to resist the impulse to eat them immediately, but they will taste better after being marinated for a while… Will keep up to a week in the refrigerator.

Freezing Beans

You waited and waited, and finally your beans start to produce tender sweet beans. First you’re content at picking fresh beans for supper everyday, and pretty soon you're overwhelmed with all the beans coming out of the garden... That’s when you need to spring into action, freeze the extras you can’t use in the summer and savor them for the down time of the garden. I’ve found adding some herbs when you blanching the beans adds extra flavor to the beans. I like to use savory herb, either summer savory or winter savory.


    Method: 
    (1) Wash and trim green beans to remove the ends, cut into sections if desired.
    (2) Bring a large pot of water to a boil with a few sprigs of savory herb in it (use approx. 1 gallon of water per lb. of beans).
    (3) Add beans to the boiling water; leave heat on high, cook for 3 minutes. 
    (4) Plunge beans in cold water immediately to cool.
    (5) Pack beans in plastic bags in cooking portions, then place bags in a larger freezer bag, freeze. 

Oh, My Shawarma!

My shawarma:

Basic shawarma seasoning:
1 part cumin,
1 part salt,
2 parts curry power (you can use an assortment of red, yellow or green),
Mix together and store in your cupboard until needed.

Meat: Beef, chicken or lamb

Cucumber Sauce: Grate cucumbers, sprinkle with salt. Wait a while and then squeeze out the water. Add grated garlic, grated onion, lemon juice and Greek yogurt.

Mix together the following and marinade for 1/2 hour before cooking:
cut up meat, basic shawarma seasoning, lemon juice, grated onion, grated garlic and olive oil.

Grill until done. Serve with rice, pitta bread (I will show you how to make this easy bread in another blog). Easy and delicious dinner.

Lentil Brown Rice Salad-Heart Healthy and Delicious

Lentil+Brown Rice Salad

Lentil Salad

Anytime you can mention heart healthy and delicious in the same sentence, I am all for it. This lentil salad I made fits the bill. Not only it is packed with nutrients and fiber, it is so delicious that you will want to eat it over and over again. As to your standard fare the macaroni salad, you might as well toss it together with the cotton candy. Rather than a set recipe, this is more of a cooking method. So go at it, use whatever pleases your palette, and enjoy!

(1) Soak lentils in cold water overnight in the fridge. Drain the soaking water, add fresh water and cook the lentils in boiling water until tender, half an hour also.
(2) If using brown rice, add cooked brown rice
(3) Add chopped nuts. You can use hazelnuts (my fav), almonds or pecans.
(4) Mix in chopped dried fruit. You can use cranberries, resins, apricot, currents, blueberries or cherries.
(5) Add chopped onion, minced garlic, olive oil, lemon juice, freshly chopped parsley and a sweetener, such as honey, maple syrup or agave syrup. And salt and pepper to taste.

Can You Handle More Zucchini? Oh Yea!

It is at the height of summer, your zucchini plants are pumping out zukes like there is no tomorrow. What to do? I have discovered a great way to use them up. ZUCCHINI KIMCHI! Oh my gosh, it is so good, I will never have zucchini troubles ever again!
Cut zucchinis into 2" long by 1/2" strips. Soak them in salt water for at least 4 hours or overnight. Add grated gingers, minced garlic, fish sauce (Available in Asian stores), a little sugar and hot pepper flakes. Slice some green apples into the mixture. Bag them in a ziplock bag, leave it out for one day, then refrigerate afterwards. Keep in the fridge for up to a week. Great with rice, Raman noodles or whatever. Enjoy!

Tomato Basil Butter

Years ago I had the opportunity to work with a German dentist on a research project. One day his wife Monika brought in some soft pretzels and a wonderful dip that I've never tasted before couldn't quite figure out what was in it. I am usually pretty good with figuring out what goes in a dish by tasting it, this one stumbled me. I asked her what the recipe was. She told me it was her late mother-in-law's family recipe, and very simple to make. There are five ingredients in it: fresh basil, garlic, butter, tomato paste and salt. Upon hearing that, I said "Of course! All familiar ingredients, I just never thought of putting them together this way." This has become one of my all time favorite recipe, especially in summer time when basil is in abundance in my garden. Here's my version of it (This recipe is also on the basil seed packet from New Dimension Seed):
2 C. loosely packed basil leaves, finely chopped, 3 large cloves of garlic, minced, 1 cube of butter (room temp), 1 small can (6 oz.) of tomato paste, salt to taste. Mix all ingredients together until well blended. Use for sandwich spread, serve soft pretzels or fresh baked bread. YUM!!! 


Blackberry Scones

Every summer blackberry rambles along an old logging road near our place. The juicy sweet berries are free for the picking. One recipe I love to make with these fresh free berries is blackberry scones. It is great with coffee or tea. Enjoy!

2 C. all-purpose flour,
1 C. rye flour,
1/2 C. sugar,
2 1/2 t. baking powder,
1/2 t. baking soda,
3/4 t. salt,
3/4 C. cold butter, cut into small cubes,
3/4 C whole milk,
1/4C sour cream,
1 C. blackberries (or other berries),
Egg wash (1 egg beaten with 1 T. water),
sugar for dusting.

Sift the dry ingredients together, cut in cold butter to form a course textured mixture. Add the wet ingredients, kneed gently to form a soft dough. Refrigerate the dough for about 1/2, then roll the dough out on a floured surface. Spread blackberry on half the surface, fold the other half on top. Pinch the sides. Cut into triangles. Brush the surface of the scones with egg wash then dust with sugar. Bake at a pre-heated 424F oven for 12-15 minutes until the golden.

Blueberry scones
2 C. white flour
2 C. rye flour
1/2 C. sugar
1/2 t. salt
2 t. baking soda
2 T. lemon juice
1/2 C. butter
1 C. butter milk
1 egg

Mix egg, butter, sugar, salt, lemon juice, butter milk together until smooth. Sift together while flour, rye flour and baking soda. Gradually add the flour mixture to the liquid. Roll out the dough on a floured surface. Pour blueberry syrup on the surface, then roll up the dough. Cut into 1" thick slices. Bake at 425 F for 12 minutes.


Early Maturing Vegetables Fare Better

Here in the Pacific Northwest, it is another year of cool weather. If this becomes a pattern, we gardeners will have to adapt. There are several strategies we can use to get an early harvest despite of the adverse weather conditions, the most important one I think is to plant early maturing vegetable varieties. I have made that my quest for the past decade, many of the early vegetable varieties are included in my New Dimension Seed collection.
Bell pepper usually requires lots of heat and extended time to maturing, I plant a pointy shaped sweet pepper called Early Red Roaster Sweet Pepper. It sets peppers early on and the peppers turn color a lot sooner than the bell peppers. The plant is stocky and robust, no worry about if falling over. It has high fruit setting rate, one small plant can produce 20+ peppers. It is good for stuffed peppers, roasted for sandwich and dips, even chili rellenos (the non-spicy version). It is late July, the peppers are already putting out large fruit.
Another one of my favorite early maturing veggies is Opus Eggplant. For the story of Opus Eggplant, you'll have to read my blog http://thegardenchronicle.blogspot.com/2011/03/story-of-mr-holland-and-opus-eggplant.html...

Happy Gardening!

Fingerling Potatoes

Last fall, I got three kinds of fingerling potatoes from Cecil and Gwen, they are red, pink and white. Cecil and Gwen is a lovely couple who have a big garden, each year they fill the garden with potatoes, onions, beans, squashes, tomatoes, cucumbers and any veggies you can think of. Besides enjoying the fresh veggies, they can and preserve much of their harvest to feed the extended family and whoever happens to stop by. Cecil and Gwen came from many generations of gardeners, their parents gardened in the 1930's, their grandparents gardened in the 1900's. The garden tips I got from them are the real deal, simple, effective and cheap. Cecil and Gwen  make the best soap bars they call "Columbia Bars", only natural ingredients were used. After bathing with their soap, the fragrant lingers on all day. Unfortunately, the only place you can buy them is at Scappoose Farmer's Market...

Cecil told me about how he got started on these wonderful fingerling potatoes. Years ago, someone gave him six fingerling potatoes. Instead of eating them, he planted them. That fall he harvested a couple dozens of them. He didn't eat any of it, instead he saved all his harvest and planted again next year. From then on, each year he would save a bucket of the best potatoes and plant again next season. I was lucky enough this year to get about 5 lb. of the fingerlings them. I planted them all this year in early May. When I first planted the potatoes, the rows were kind of bare, so I planted some lettuce in-between the potatoes. It worked out really. I was able to enjoy the lettuce before the potatoes were up. As the weather got hot, the potatoes were able to shade the lettuce, delaying the bolting. It is a real good combination. When the potatoes got to about 2 foot tall, I piled on soil at the base and continue to do so throughout the season. I was told by Cecil this will make the potatoes more productive as the buried portion will produce potatoes.

Buy the end of July I was able to dig out a few to taste, they did not disappoint! They are creamy, sweet and buttery good. The potatoes start to bloom, I can tell by digging around the base there are quite a few potatoes in there. By August, the weather is heating up and the potato plants starting to deteriorate. I pumped more water making sure the base is moist, allowing the tubers formed at the base to grow even larger.


Huckleberry Cream Cheese Roll

Foraging around the woods on our friend's property, we came across some huckleberries. This cream cheese roll is what I did with the huckleberries to showcase the delicate flavor. Judging by how fast it all disappeared I'd say it's a success...

For the cake:
3 eggs;
1 C. white sugar
1/3 C. Sour Cream;
1 t. lemon juice
3/4 c. flour
1 t. baking powder
1/2 tsp. salt

1. Beat the eggs, lemon juice and sour cream together until fluffy. Sift together the dry ingredients, gradually add to the egg mixture. Beat to incorporate. This will make a thin batter. Pour the batter in a sheet pan. Bake in a preheated 425F oven for 12 minutes. Remove immediately.

2. Carefully separate cake from the pan with a thin cake decorating blade or other instrument. Place a piece of wax paper on top of the cake and flip the sheet pan to release the cake.

3. Roll up the wax paper to a loose roll. Let set until cool.

For the filling:
1 pack of cream cheese;
1 stick of butter;
Huckleberry syrup (cook 1 C. huckleberry with 1/2 C. of sugar until the berries softens and release its juice)
Beat all ingredients together until smooth.

Assemble:
Unroll the cake roll, spread the filling evenly on top. Roll the cake up carefully. Frost the extra fillings on top of the cake. Serve.
Option: You can dust some powdered sugar on top. In this case, the cake was gone before I had a chance to do that. Thus it doesn't have powdered sugar on it...


Oh No! Zucchini is Coming!

In my opinion, everyone should have zucchini plants in their vegetable garden. It is the one vegetable that can bring you as much pride as embarrassment. Zucchini is among the first in the garden to produce. You probably remember how excited you are when you get the first fruit. It's like breaking the fast after a long winter without fresh veggies. And then it all hits you, as one zucchini plant can put out 20-30 zucchinis, you'll get 4, 5, 6 zucchinis a day. You probably have done your share of pushing them on everyone you come in contact with. I have certainly done my share of racking my brain to find new ways to dispose of them. Here's a few strategy I've derived from my experience. So next time a zucchini storm hits you, you'll know what to do.


Zucchini pancakes is always the fist thing I make when fresh zucchini become available. Recipe: combined the shredded zucchini with new potatoes and fresh onion from the garden, added salt to draw the moisture out of the vegetables and added one egg and just enough flour to bind everything together. Cook it like you would pancakes on a flat non-stick pan with a small amount of oil on the bottom.
Next: you can try to grill the zucchinis. Slice them to 1/4" thickness, brush with olive oil, sprinkle salt and pepper and garlic powder and/or dried herbs. Grill until it takes on some grill marks. They make great vegetarian sandwiches.
Next: Saute zucchini with olive oil, green olives, onion, garlic, lemon juice, capers, herbs and Ricotta Salata... goes great with a loaf of crusted Italian bread.

If you tried everything else including giving them away but still have too many of them, then pick the flowers off the plants before they get a chance to bother you. By the way, zucchini blossoms taste great stuffed with cheese. That's the subject of another blog.

Bye for now. Remember, keep your sanity in zucchini season.  And Happy Gardening!

Life Lessons I learned by Gardening

It is difficult to say the words "life lessons" without sounding preachy. However things I learned by gardening fall into this category fair and square. I'll try to keep it simple and hope some of this will translate in real life...

1. Living with imperfections: Don't worry about your garden being perfect. The pristine vegetable gardens you see on magazines rarely stay that way after the photo shoot. Keep the weeds down when your plants are young. You just need to play a hand at tilting the odds in their favor. If you did that, plants will be able to compete with the weeds on their own when they are bigger. Do whatever you need to create the most favorable environment for your plants so they can be more productive.

2. Taking care of problems early on: Whether it is weeds or insect, spotting the problems early on and taking actions is the best you can do. Even if the problems seem like an non-issue. If you let the problems fester, it will come to a point of no-return, and you will lose everything.

3. Letting go: At some point of the plants life, you will find yourself putting more energy into it than it is worth. This is the time to let go. Be decisive, remove the unproductive plants, replace them with something new. No sense wasting your time wondering what could've, should've, would've. This is one way to keep your garden productive. (Now this does not translate in elderly care, just sayin...)

4. Last but not least, shit happens. When it does, take whatever actions needed and move on. Just like a good doctor you can too bury your mistakes.

Always learn from your experience or others' experience. It will not only make you a better gardener, it will make you a better person.... Happy gardening!

Cabbage Rolls Summer Delicious

Cabbage rolls is one of my favorite summer dishes, especially using the first head of cabbage from my garden. I through in plenty of herbs, whatever is in season and use home made tomato sauce from last season. The smell of my kitchen is enough to make anyone droll... This time I used fresh peas (cooked with rice), leaks and fresh spring onions. The stuffing is seasoned with garlic salt and a pinch of hot pepper flakes. Easy peasy delicious!

The Taste of Spring: Creamed New Potato and Fava Beans Plus Peas

Fava beans, fresh peas and new potatoes represent the first things coming out of the garden in the spring. They happen to make a fabulous dish together: Creamed New Potato and Fava Beans Plus Peas. The fresh flavor of this dish will make you want to grow a garden every year.
1.5 C. fava beans and fresh peas, shelled. For fava beans, jackets removed;
1 medium sized new potato, cut into pea sized cubes;
1 T. butter
1 T. flour;
3/4 C. milk or half-n-half, or a combination of the two;
1 clove of new garlic, crushed (use dried one if a new one is not available. If you grow your own, the garlic is about ready to use when the fava beans and peas are harvested)
Steam peeled fava beans, peas and potatoes in a steamer for about 10 minutes or until they become tender to the bite.
Heat a non-stick skillet on medium heat, add butter and flour. Cook until flour turns slightly brown. Add liquid. Stir until the sauce thickens. Add crushed garlic, steamed vegetables salt and pepper. Stir to combine. Serve immediately.