Chinese Cabbage Salad: It is June, where is the sun?!

The first part of June has been wet and cold. We had record breaking rain fall of over 4", record low day time temperature... and the sun is no where to be found. All this is not good news for vegetable gardeners. While the cool crops are loving it, my beans, cucumbers, tomatoes and eggplant are just sitting there and getting attacked by insects :( Taking it in stride, I've had plenty good tasting radishes, lettuce and Chinese cabbage... I enjoyed my oriental salad made with Spring Queen Chinese Cabbage, here's the recipe:

4 C. fresh Chinese cabbage, cut into 1/2" strips
1 package of Top Ramen noodles, broken into small pieces
1/2 C. pineapple pieces
1/4 C. red bell pepper pieces
2 fresh scallions (small Flagpole Giant Green Onion)
Dressing:
1/2 C. light soysauce
1 T. balsamic vinegar
2 T. red wine vinegar
1 T. olive oil
1 t. sesame seed oil
1/4 C. brown sugar
Salt and pepper to taste
Pour dressing on the cabbage and Top Ramen mixture, toss to coat, sprinkle pineapple, red pepper and scallion pieces on top. Serve immediately.

An Eventful May 2010

May turned out to be an eventful month. I got the garden ready in late April while we were having a few nice warm days. Early May, I was all pumped up and ready to plant. I planted my usual cold crops, radishes, peas, onions, spinach, cabbage and beets in the ground. The few nice days that followed gave me the false sense of security, thinking the cold weather is gone, I transplanted my tomatoes and peppers and eggplants in the garden and hoping they'll get an early start and I will have an early harvest.... And then it happened, a hail storm hit us right after I transplanted all my seedlings, I rushed to cover my tomato seedlings but some have suffered pretty good damages. I felt lucky I didn't the cucumbers I started out in the garden, they would've been pulverized.

Just as I was trying to nurture my plants back to their health, I detected flee beetles in my garden and they had already done quite a bit of damage to my radish and cabbage, and they are working on my pole beans. I sprayed the garden with Neem, an organic pesticide (1.5 table spoon of Neem Oil in a gallon of water) and got the flee beetles under control.
Whew!
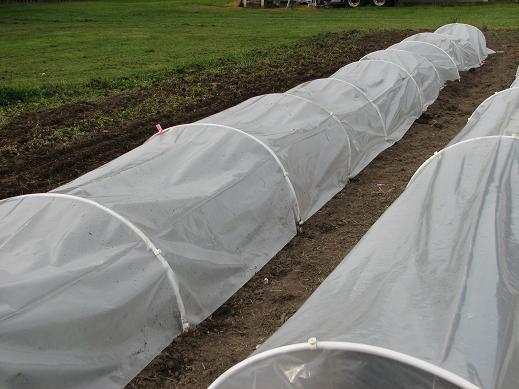
The truth is here where I am, even though the official "last frost date" in spring is April 15, the ground temperature in May still fluctuate quite a bit. What I've learned is if you count on luck along, it will come back bite you. On the other hand, if you want to plant early, using protection, raise the ground temperature is the only way to ensure success. Last year I planted my tomatoes in May and I used MiniHooper, a mini hoophouse I designed to cover early crops, to protect my seedlings. The cold rains really didn't bother my seedlings since the temperature inside the hoophouse is 10 degree above the soil temperature outside. And I started my bush beans inside a Mimihooper. I've harvested beans by the 4th of July and had early harvest on my tomatoes, peppers and eggplants as well.

Now it's June, looking forward, most of my plants survived May. I am hoping they will start to take off once the warm weather sets in. So here the lesson I learned: don't count on your luck alone (everyone can use some) when it comes to planting in early spring. A few nice days in April fooled me, I did not cover my seedlings, turned out my "luck" was not there. This is a mistake I don't care to repeat.

Happy Gardening!

To Till or not To Till?

There are two schools of thoughts when it comes to tilling, one is till before you sow, I think it is practiced by most home gardeners; the other is no-till at all.... the no-till method sounds good in theory, but I haven't seen it practiced much in home gardening. What's your thoughts? I should add that tilling here is a loosely defined term, it also include digging the garden up (or not) before planting.

To me, tilling signifies the gardening season is in full gear. Usually I'd have my veggie starts in the nurseries anxiously awaiting to go in the ground. The sight of freshly tilled garden sets my brain into high gear, planing, layout, irrigation etc. etc... I can't help but picturing what the garden will look like in just a short few month, and the dishes that will come out of all the veggies I will be harvesting! Granted I will have to deal with the weeds as the season progresses, there's no getting around of that... This is just the way things have been done in my garden year after year. I have a system worked out, and I am comfortable with it...

The no-till proponents suggest by not disturbing the soil, you are not activating the weed seeds in the ground, therefore, they do not germinate. A garden with no weeds? Who wouldn't want that?! And, by not tilling, you preserve the soil structure and keep the moisture and protect the soil from erosion, and you save water and fuel (by not running your rototiller) . I've read about the no-till methods from different sources, took a seminar on the subject, but I have not seen many in reality. The no-till method intrigues me, but right now I have more questions than answers, what about the nutrients? the disease control? etc. etc... It would help if I someone else can share their experience and PICTURES particularly...With all the great benefits of no-till, I would like to try it some day. I think I need a plan, but right now, I have no plan...

Either way you choose to do it, have a system and perfect it. And please share your experience on FB, we'd all want to know... (I hope I am speaking for the majority of us)

A Lesson Learned


A few years ago, I learned that clover could be used as a cover crop to enrich the soil in your garden. It was October, my garden was bare, so I decided to give it a try. I ordered some clove seeds and spread them in my garden. Well nothing happened that year and I promptly forgot about it. The next season I started noticing little clovers plants popping up everywhere. And as years go by, they were getting bigger and bigger. Now I've got a problem, the clovers are growing into thick mats, and are choking out my vegetables.
Years later, I am still fighting the battle of eradicating clovers from my garden. Now I have some friends on my side. I discovered my chickens love the tender leaves of the clovers, so feed the dug up clovers to them.
I still see advises on the internet telling people to plant clover as a cover crop for vegetable gardens. What I wonder is have these people actually grown it in their own garden?
The moral of the story is not all information you learn could or should be putting into practice. If you find some information you are not sure of, check with your friends first, or better yet, post it on FB and see if you can get some answers.
Friends won't let friends harming themselves with dangerous information!

Seed Starting in Stages

Even for seasoned gardeners seed starting can be tricky at times. If you don't have a professional setup with lighted benches and misters that keep your seeds in the ideal conditions, and the time to baby sit your seedlings, growing seedlings in stages can simplify your life as a gardener. It offers an easy and efficient way to grow your own seedlings.
Method:
1. Incubator Stage: Sow seeds generously in a 4" pot or a 12 oz paper cup with holes punched on the bottom. Keep the container in a sunny spot like a south facing window. Keep it moist until germination occurs. If you have any warming device such as a seed starting mat feel free to use it.
2. Small Seedling Stage: When the seedlings grow a little taller and when the 3rd set of leaves are just begin to emerge, transplant them to larger containers. I use 2" pots. At this point, eliminate all the weak seedlings, keep only the healthy and strong ones. Dump the entire container with all the seedlings on a flat surface. Pick out each seedling carefully as not to damage their roots, pot them up in 2" pots. Avoid trying to transplant them too early. If the seedlings are too young, they may not survive the transplanting. Allow the seedlings to grow and fill up the 2" containers. In some cases, this will be adequate for the seedlings to move out to the garden (temperature permitting), for others they will need to be moved to larger pots.
3. Large Seedling Stage: Move the seedlings from the 2" pots to 4" pots will give them more growing space. Usually this is all you need to do before transplanting them to the garden. You can regulate the growth by exposing the seedlings to the right temperature condition. If they are growing too fast, leave them outside. Just be sure to bring them in when the temperature gets too low. This will also harden them off so they will be ready to be transplanted into the garden. Now just wait for the nice weather to arrive so you can plant them... Meanwhile, dream up some delicious recipes and wait for the veggies to get ready.

Two Easy, Good Bread, Practice Until You Own It!


Bread making is easy, just follow a few rules any one can make a delicious loaf of bread from scratch. It may take you a while to become a master bread maker, but I think you should at least learn a couple to give you the satisfaction of eating fresh baked bread. That's right, practice until you own it! I will share with you two types of bread I make most often, they are also the easiest to make. Find yourself a heavy crock for bread making. I use an oval insert of a slow cooker. Nice thing is, it comes with a lid.
1. Sue's Pillow Bread: For dough: Dissolve 1 T. dry yeast, 1 T. sugar in 3/4 C. warm water, add 1-2 T. oil, one egg, and 1 t. salt and enough flour to make a soft dough. Let the dough rises until doubled in size. Place the dough in a well floured surface. Roll out the dough to about 1-2" thick, brush the top with egg wash and sprinkle with salt, pepper or sesame seeds or any other topping you like. Cut into ~3" squares with a pizza cutter, arrange the pieces on cooking sheet lined with parchment paper. Let it raise until puffy (be patient!). Bake in a per-heated 375 F oven for 15-18minutes. (you may need to check it at 15 minutes first time you bake it in your oven, it goes from perfect to burnt pretty quickly). Enjoy! This is a great bread for sandwich making.

2. Overnight Bread: This one is even easier. Mix together: 1 t. dry yeast, 1 t. kosher salt, 3 C. flour, 1-1/2 C. water. Stir just combined. Cover, leave it in the bowl for 12 hours. 12 hours later, place a cast iron skillet in the oven, heat the oven to 500F. Dump the dough on a floured surface (the dough is quite soft at this stage), fold it up so it will fit in the cast iron skillet. Bake for 30 minutes with the lid on, then another 10-15 with the lid off. Viola! Enjoy!
In case you need a visual reference, here's a link: http://www.youtube.com/watch?v=13Ah9ES2yTU)

Get ready, set, sow!


It is that time of the year again, gardeners everywhere are itching to start their vegetable garden. Before you start your seeds, let's look at some of the basics of seed starting.
First make a good soil mixture, I like to use a large Rubbermaid tote (18 gallon). My formula consists of  50% of potting soil (1 large bag of potting soil, 2 cubic ft size), 25% coconut fiber (available in pressed bricks or bags) and 25% vermiculite. This will give the soil enough lightness and water retention for seeds to grow. Next I add  2 C. of slow release fertilizer (polymer coated 14-14-14 or 16-16-16) to the soil mixture. This will give the seedlings some baby food once they germinate, and allow them to grow in the soil until you are ready to transplant them to bigger pots. All kinds of containers can be re-purposed for seed starting. Make sure you cut holes on the bottom for drainage. Fill the containers with the soil mixture and sow your selection of seeds, cover the seeds with a thin layer of the soil mixture, water then tap it down to make sure the seeds have good contact with the soil. Keep your containers in a warm spot, keep them moist, with a little TLC they should germinate soon. Keep in mind, fresh seeds will germinate sooner than old ones, so buy high quality seeds whenever you can.
Long maturing vegetables such as tomatoes, peppers and eggplants must be started indoors, while short maturing types can be direct sowed. When sowing out doors and transplanting always keep a close watch on the temperature, especially pay attention to soil temperature.
The following is the dates I sow my seeds:
Jan.: Onions, green onions;
Feb-March: Indoors: Tomatoes, peppers, eggplants; Outdoors: peas, spinach, beets, fava beans.
April-May: indoor/outdoor: radishes, lettuce, cole crops (cabbage, broccoli, kohlrabi), zucchinis and watermelons.
June: Beans, soy beans, cucumbers, melons, carrots, just about anything can be sowed or transplanted to the garden by now.
Here's a little something special about cucumbers: I really like cucumbers and would do everything I could to get an early harvest. You can start cucumbers indoors, but I generally do not recommend that. Cucumber roots are extremely tender, they don't fare well when transplanting. It take them a long time to recover from the shock. From my experience, it is better just to sow them direct. If you do wish to get an early harvest, use other methods such as covering the sowing sites or use a cold frame over the cucumber seeds you sow.
And for a fall crop sow seeds at the end of July and early August. Many vegetables do well in the fall. By then a lot of your crop are cleared out of the garden. Planting a fall crop is a great way to extend the fresh veggies all the way into the winter. That will be the subject of another blog.